 Keripo's Corner Figures, Dollfies, Projects, Gaming, and TYPE-MOON
Earlier this year, I made a bunch of Fate/Grand Order cards on a whim to hand out to Fate cosplayers and F/GO players at Sakura-con 2016. Being a last-minute idea, they were cheaply made using simple sheets of paper and some packing tape. Despite this, people loved them and I quickly ran out before the end of the 3-day con. And so, for this upcoming Anime Expo 2016, however, I decided to make a second batch of cards, but in larger quantities and much higher quality.

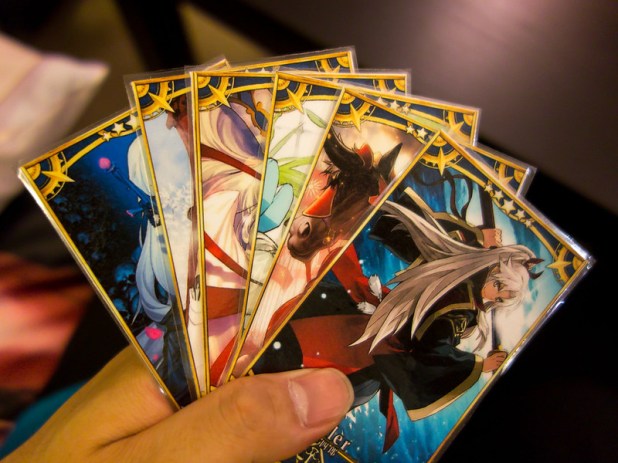
Except replaced Kintoki with Arcueid, just cause I can :P
Like with at Sakura-con, I will be handing these out for free to fellow Fate cosplayers and F/GO players that I meet. Since I’ll just be attending as a regular attendee, my current schedule is still very tentative, but if you want one, you can find me at the Fate/TYPE-MOON gathering/photoshoot on Sunday July 3rd, 5-6pm at Site 7 (outside West Hall’s entrance). I’ll be in my Male Protagonist (Gudao) cosplay and will hand them out after the photoshoot (as well as to anyone who manages to find me during the four-day convention). For those who won’t be able to attend, I’ve documented the card-making process below so that anyone interested can go make their own Fate/Grand Order cards.
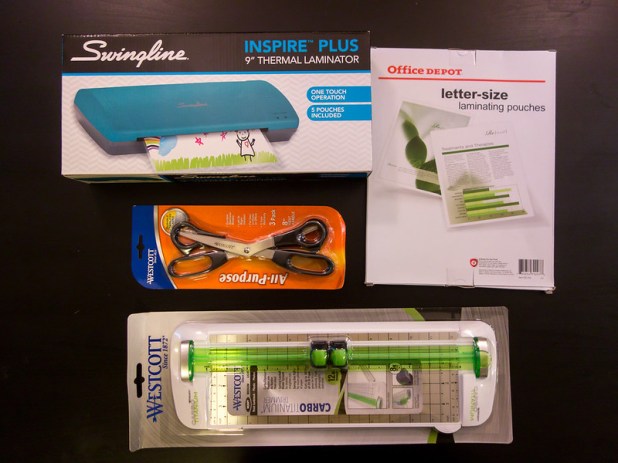
Materials- Sturdy white card stock (~$10 for a pack of 100)
- High quality colour printer + ink cartridges (~$50 for a new 3-colour ink cartridge pack)
- Paper trimmer ($20-$50)
- Pair of scissors (~$5)
- Dry glue sticks (~$5 for a value pack)
- Paper laminator ($20-$50)
- Laminating pouches (~$20 for a pack of 50, though you probably don’t need that many)
- Screenshots of cards you want to print
- Lots of free time and patience
My friend and fellow con-goer Tsukikira helped provide the card stock and the printer. I took a trip to the local Office Depot and picked up the cheapest paper trimmer, laminator, and laminating pouches I could find (plus some new scissors cause my old pair broke). Had to also run to the local grocery store later when I realized that all my glue sticks at home had dried out. Could probably have gotten all the items cheaper off Amazon.com, but oh well.
The first step is to prepare the card images for printing. I’ve uploaded my cards’ source images here, which also includes a custom Berserker Arcueid and Caster Tohsaka Rin that I Photoshopped (Arc for myself, Rin for Tsukikira). If you want to obtain your own screenshots (such as for your favourite 3-star Servant), the easiest way to do it would be through My Room in-game for stats consistency.

Click the far right option to go to My Room.

Click the first menu item.

Then the first one again.

Select the Servant you want to get a screenshot of.

Tap on the Servant’s image.

Take screenshot! Note that the Servant card will always have max level stats (no Fou-kuns), but the artwork will be whatever highest level ascension you have of that Servant.

Once you’ve amassed all the card images you want, the next step is to arrange the cards for easy printing. Since most printers take regular 8.5″ x 11″ legal size paper, it’s easiest to lay them out that way. I used Photoshop here to arrange them in a row of 4 for ease of cutting (with the card backs upside down right under the cards).

Once you’re done, you should have many images containing multiple cards, ready for printing.

The second and most expensive stage (but luckily the easiest) is printing out the cards. While you can use regular paper (like I did with my V1 cards for Sakura-con), I would highly recommend you get a pack of thicker card stock instead since they are more durable and give a better “card” feeling to the final cards. In addition to using high quality printing material, you also want to use the highest quality printing settings on your printer. This usually means 1) cranking all your printer options to max, and 2) tricking your printer to thinking it’s printing on photo paper rather than regular paper (then ignore the warning when it tells you that you’re using the wrong type of paper). Here’s some sample settings that I would use on my printer. Each printer will have different settings, so you will need to experiment (I used Tsukikira’s printer, which had similar settings but printed out much cleaner).

Assuming you have a good printer and enough ink, the result will be crisp clear printouts with nicely defined edges and outlines that will look similar to what a manufactured card would look. Of course, getting those perfect settings will take a few trial-and-error attempts, as you see below.

Once you’ve got the printer settings down, go ahead and print em all out! Three decks of high quality prints of 45 gold servants ended up burning through a full set of coloured ink cartridges and some. Luckily Tsukikira had an extra ink cartridge pack ready.


Here’s some of the bad prints when we ran out of ink.

Once you’ve printed out all the cards, you’ve got to cut them out. While you can go the good old fashion way and cut everything out very carefully with a trusty pair of scissors, for the quantity I was dealing with, I’d rather just invest in a paper trimmer. Which I did, and life was much, much easier.

Given the dimensions, I found it easiest to cut off all the edges at once first.

All excess card stock went into the recycling bin.

Sheets of cards prior to being individually cut.

A few hours later, all cards were individually cut.

Huge stack of individually cut cards. Note that I did NOT cut the card back off purposely. Keeping the two halves attached allows me to just fold the card and ensure the front and back are aligned.

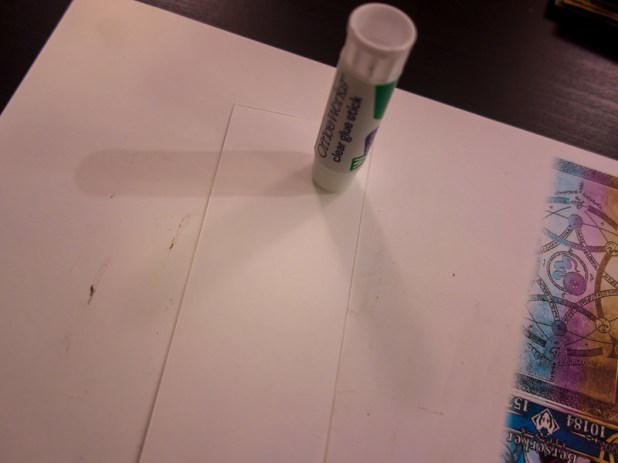
To ensure the two halves of the card stay together, I highly, highly recommend gluing them together using a dry glue stick (not the liquid type though as that would cause the card stock to deform). While you’d think this would be solved in the lamination step, because of the small card dimensions and thickness, you will likely get small air pockets around the borders of the cards where the two halves aren’t actually sealed together fully.
As for the actual glueing part, I experimented with two approaches. The first was to first fold the card in half, unfold it, apply glue, then re-fold it. While this ensured a clean and accurate fold, it was pretty time consuming.


Being pretty good at paper-craft (having done lots of origami and general arts-n-crafts kind of stuff when little), I opted instead for the faster approach of first applying the glue, then folding the card directly onto the glue. The tricky part of this is that if you mis-align, the two halves are partially stuck and you risk damaging the card when peeling them apart. Happened to one or two of the cards, but I was careful enough to recover without any noticeable damage.


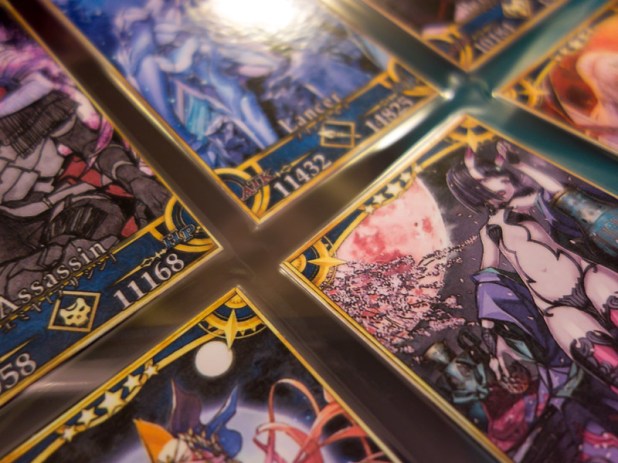
Lamination gives cards a much more professional feel and look (and also ensures the printed ink doesn’t get smudge by any mysterious liquids that you may accidentally spray on your waifu card). In the original batch I made for Sakura-con, I just used simple packing tape to laminate the cards. This time around, I went the proper route and got a self-operated laminator (which is actually cheaper than if I were to pay Office Depot to do the lamination for me due to how many sheets I needed to laminate).
For my lamination setup (which I would assume is very similar for most), I took a laminating pouch, opened it up, then laid all the cards on it evenly spaced out.

Once the cards were laid out, I slowly fed the pouch through the laminator, which then started moving the pouch in by itself. Note that I used some stuff to elevate the pouch on both sides so that I could have a roughly level feeding angle (otherwise the cards would slide out of the pouch).

And here’s the laminated sheet of cards!

Note that as mentioned before, because of the small card sizes, the edges won’t be perfectly sealed and there will be a line of air bubbles. This is to be expected of a cheap laminator setup and folded cards that aren’t 100% flat. But it’s fine since the lamination still does its main job: making the cards look clean and shiny and durable.
Sheets and sheets of laminated cards, ready to be cut out.

Once the sheets of cards have been laminated, they need to be cut out again. Since it’s next to impossible to align the cards perfectly when feeding them through the laminator, each card needed to first be roughly cut out by hand with scissors.

The roughly cut cards were then individually properly trimmed using the paper trimmer again. As a general rule of thumb, I would leave ~2mm of lamination border around each card. Too much and the lamination edges become too prominent and awkward when holding the card. Too little and you risk the inner card stock being exposed/cut.

Pile of trimmed off lamination

Final triple stack of Fate/Grand Order Servant cards! With the lamination, each “deck” of gold cards barely fits my pocket.


Definitely nice and professional looking. As I did for the Sakura-con cards, I signed the back of each card with “Keripo, AX 2016” (except a few which Tsukikira did the honours for).
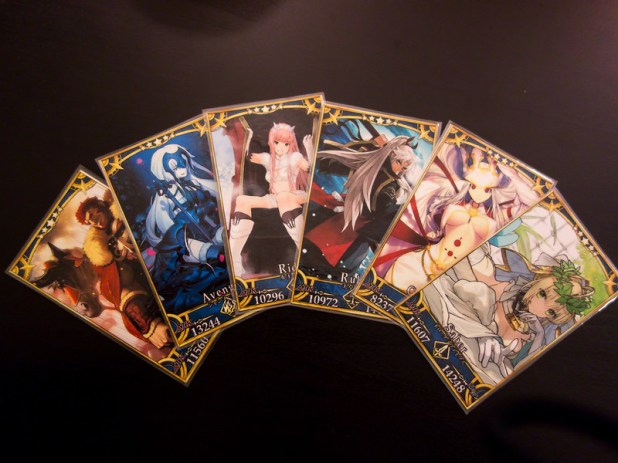

As a special one-off thing, I made a custom Berserker Arcueid card for myself, a custom Caster Tohsaka Rin card for Tsukikira, and a Rin dango CE card for JakLegend (who helped the most with getting screenshots of some of the gold servants that I was missing). And yes, I know, I forgot to photoshop the correct names underneath the class text… I didn’t notice until after I finished printing them, oops >_>

Here’s my Team Basaka in physical card form, with Arcueid replacing Kintoki (and no space for Beowulf either).

Random selfie to give you an idea of card size (larger than regular TCG cards or Poker cards, but smaller than Cardcaptor Clow Cards).

And that’s it for the tutorial/blog post on making these Fate/Grand Order cards.
And before you ask, no, I will probably not be making more of these in the future (too much work and I’ve more or less stopped playing F/GO as well), and no, I will not be selling any of the ones I’ve made (even if you offer to pay me $100 or more). These were made to give away to fellow TYPE-MOON fans for free and for fun. If you want one, either find me this weekend at Anime Expo 2016 or follow the above instructions and make your own :)
~Keripo
Flickr: https://www.flickr.com/photos/keripo/sets/72157670289829516
Reddit: https://www.reddit.com/r/grandorder/comments/4qev7d/handmade_fategrand_order_cards_for_anime_expo_2016


